
If you’ve been searching for a comprehensive guide on how to use a mirrorless camera, you’re in the right place. Whether you’re a budding photographer or someone looking to switch from a traditional DSLR, understanding the nuances of mirrorless cameras can significantly enhance your photography game.
The goal of this article is to demystify the process of using a mirrorless camera. From basic setup and configuration to advanced shooting techniques, you’ll find actionable tips that can be applied immediately to improve your photography.
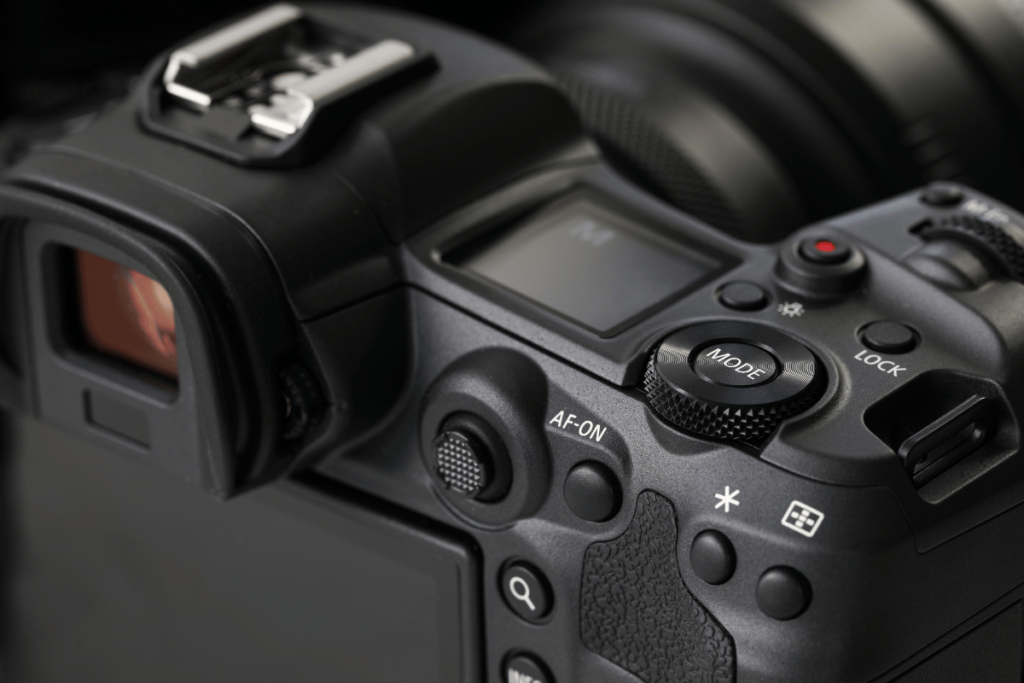
What are the Main Components of a Mirrorless Camera?
The Body
Think of the body of your mirrorless camera as its heart and soul. Unlike its bulkier DSLR cousins, mirrorless cameras boast a more compact frame. This doesn’t just make them easier to carry around on your adventures—it also means they can fit in some quite snug spots. Whether you’re capturing the hustle of city streets or the serene landscapes outside town, the lightness of a mirrorless camera body ensures your photography journey is less about the load and more about the experience.
The Lens
Mirrorless cameras offer an impressive array of lenses, versatile enough for nearly any scenario you can imagine. From wide-angle lenses capturing expansive landscapes to telephoto lenses zooming in on distant subjects, there’s a lens for every shot. Remember, the lens you choose significantly impacts the image quality. So, picking the right one based on your shooting environment and subject isn’t just useful—it’s crucial.
The Sensor
At the heart of image quality, lies the sensor. Larger sensors found in mirrorless cameras capture more light, which translates to richer, higher quality images. This is particularly noticeable in low-light conditions where every photon counts. Keep this in mind when you’re out shooting in the evening or in dimly lit venues.
The Electronic Viewfinder (EVF)
Gone are the days of optical viewfinders with their limitations. The EVF in a mirrorless camera provides a digital display of your scene, offering an accurate preview of your final image. This means what you see is pretty much what you get, including exposure, white balance, and depth of field. It’s like having a crystal ball that shows the future of your shot—helping you make adjustments in real time.
The LCD Screen
For those who prefer to frame their shots without peeking through a viewfinder, the LCD screen is your go-to. It’s especially handy for shooting videos or taking selfies. Plus, many mirrorless cameras come with a tilting or swiveling screen, making it easier to capture those tricky high or low angle shots.
How to Master the Manual Settings of Your Mirrorless Camera?
Taking Control: Manual vs. Automatic
Ah, the age-old photographer’s dilemma: to go manual or let the camera decide? Here’s the scoop: diving into manual mode on your mirrorless camera opens up a world of creativity and control that automatic settings just can’t match. Think of it as the difference between cooking with a microwave vs. a gourmet oven. Sure, the microwave is convenient, but the oven gives you the control to whip up a masterpiece.
The Exposure Trio: Aperture, Shutter Speed, and ISO
Let’s break down the Big Three: aperture, shutter speed, and ISO. These are the backbone of understanding how to use a mirrorless camera like a pro.
- Aperture: This is all about the size of the opening in your lens. Fancy a blurred background? Crank that aperture wide open. Need everything sharp from front to back? Close it down. It’s like deciding how much sunlight you want to let into your room.
- Shutter Speed: Imagine you’re capturing a sprinter mid-stride. A fast shutter speed freezes the action, while slowing it down turns the runner into a beautiful, flowing blur. It’s your camera’s way of saying, “Hold that pose!”
- ISO: This adjusts your camera’s sensitivity to light. Low light? Boost that ISO. But beware, too high and your photos will start looking like they’ve got the chickenpox – that’s digital noise for you.
Balancing Act: The Exposure Triangle
The exposure triangle sounds like something out of a photographer’s mystic handbook, right? It’s simply about balancing aperture, shutter speed, and ISO to achieve the perfect exposure. Like a high-wire act, every adjustment to one element requires a counterbalance in the others to maintain harmony in your image.
Scenario Practice
- Low-Light: Crank up the ISO but keep an eye on that noise. Slow down the shutter speed – just make sure you’ve got steady hands or a tripod.
- Backlit Scenes: Challenge alert! Dial down the ISO, speed up that shutter, and play with the aperture until you’ve nailed the shot.
- Fast-Moving Subjects: Max out your shutter speed, adjust your ISO accordingly, and choose an aperture that keeps your subject in focus.
How to Use the Advanced Autofocus Features of Your Mirrorless Camera?
So, you’ve gotten your hands on a sleek mirrorless camera, and you’re ready to dive into the world of photography like a pro? Excellent choice! But, a camera is only as good as the photographer’s knowledge of its features. Let’s navigate the advanced autofocus (AF) features that make your mirrorless camera a significant leap forward from its predecessors.
Understanding AF Modes
Your mirrorless camera comes equipped with a variety of autofocus modes, each serving different shooting conditions and subjects. The common modes you’ll encounter are:
- Single AF (AF-S): Perfect for stationary subjects. The camera focuses once when you half-press the shutter. It’s simple, it’s effective, and it’s your go-to for landscapes or portraits.
- Continuous AF (AF-C): This mode is for the movers and shakers. Whether it’s a football match or a bird in flight, AF-C continuously adjusts focus as your subject moves.
- Tracking AF: Similar to AF-C but with an added layer of intelligence. It locks onto your subject and follows it around, ensuring it stays in sharp focus, even against a busy background.
- Face/Eye AF: It’s as futuristic as it sounds. This mode detects and focuses on faces or even the eyes, ideal for portraiture or candid shots at events.
- Animal AF: Fido won’t stay still for a photo? No problem. Animal AF is designed to pick up on animal movements and keep them in focus, a delight for pet owners and wildlife enthusiasts alike.
Autofocus Areas
Alongside modes, understanding the autofocus areas will further enhance your photo game. The areas typically include:
- Single Point: You’re in control here, choosing exactly where the camera focuses. Great for precision, not so much for speed.
- Zone/Area: Zone focusing divides the frame into sections, allowing you to select a group of focus points. This way, you have a mix of precision and flexibility.
- Wide/Tracking: When you want the camera to take the wheel, Wide/Tracking mode analyzes the entire scene to find and keep your subject in focus.
- For portraits, experiment with Eye AF to capture
How to Use the Electronic Viewfinder of Your Mirrorless Camera?
Ever gazed through the electronic viewfinder (EVF) of your mirrorless camera and wondered how to fully harness its power? You’re not alone. Let’s demystify the EVF and turn you into a master of mirrorless photography.
Understanding the EVF
Unlike the optical viewfinder (OVF) in traditional DSLRs, the EVF in mirrorless cameras offers a digital display directly from the sensor. This means you’re seeing a live preview of your image, complete with exposure, white balance, and depth of field. Cool, right?
Advantages of EVF
Using an EVF comes with a wagonload of benefits:
- Live Preview: Get a real-time preview of your shot, exposure and all.
- Exposure Simulation: What you see is what you get. Adjust settings and watch the scene change before your eyes.
- Histogram: Keep those highlights and shadows in check by monitoring the histogram live.
- Focus Peaking: Highlights the edges of your subject in focus. Perfect for nailing sharp shots.
- Magnification: Zoom in on your subject for precise focusing, especially handy in macro photography.
Getting the Most Out of Your EVF
Now that you’re acquainted with the perks, let’s talk about making the most of them:
- Compose with Confidence: The EVF’s live preview means you’re composing your shots with the final image in mind. Experiment with different angles and settings, watching as the EVF updates in real time.
- Focus Like a Pro: Leverage focus peaking and magnification to ensure your subjects are tack sharp. For moving subjects, try using continuous autofocus for real-time adjustments.
- Expose Perfectly: With exposure simulation and the histogram, you can dial in your exposure settings before you even press the shutter. Say goodbye to guesswork and hello to perfectly exposed photos.
Avoiding Common Pitfalls
Despite its benefits, the EVF can have its quirks. Glare can sometimes make it tricky to see, especially in bright sunlight. And yes, using the EVF can drain your battery faster, but carrying an extra battery or two should keep you shooting all day.
How to Customize Your Mirrorless Camera for Your Preferences and Needs?
Diving into the world of photography with a mirrorless camera offers a universe of possibilities, doesn’t it? But, to truly harness the power of your gear, customizing it to fit your unique style and needs is key. Let’s break down how you can tweak your camera settings for optimal performance and convenience.
Tweaking Menu Settings
First off, the menu settings on your camera are like the secret sauce to delicious photos. You’ve got the power to change image quality, white balance, metering, drive mode, and flash settings with just a few taps. Adjusting the image quality ensures your photos are crisp, while tweaking the white balance can make your colors pop or soften, depending on your artistic vision. Dive into these settings, experiment, and watch your photos transform!
Assigning Custom Buttons
Are you tired of scrolling through endless menus to find that one setting you always change? Assign custom buttons to rescue! Many mirrorless cameras come with the ability to assign frequently used functions to specific buttons. Imagine changing the ISO, exposure compensation, focus mode, or focus area with a single press. That’s efficiency at its finest.
Saving Custom Modes
Got a preferred combination of settings for landscapes, portraits, or those tricky night shots? Save these settings as custom modes. This way, when you’re out in the field, switching between your favorite settings is a breeze, allowing you to focus more on capturing the moment rather than fiddling with your camera.
Examples and Suggestions
For instance, if you love landscape photography, you might want to save a mode with a small aperture setting for greater depth of field. Portrait shooters, on the other hand, could save a mode with a wider aperture for that dreamy, blurred background effect.
In essence, tailoring your mirrorless camera settings is not just about convenience; it’s about making the camera an extension of your creative vision. Every adjustment, from the menu settings to the custom buttons and modes, is a step closer to photos that not only capture moments but also your unique perspective. So, why not take some time today to explore and customize? Your next masterpiece is just a tweak away.
Conclusion
So, you’ve dived into the world of mirrorless photography, and you’re itching to get the most out of your shiny new camera. Let’s not beat around the bush—using a mirrorless camera can open up a world of creative possibilities. But, where do you start? Well, lucky for you, we’re here to guide you through it, step by step, no technical jargon included.
Customizing to Your Heart’s Content
First things first, personalize your camera settings. These nifty gadgets come packed with features designed to make your life easier and your photos sharper, brighter, and more vibrant. Think of your camera menu as a treasure chest:
- Image Quality: Always shoot in RAW. Why? It gives you the most control in post-production. JPEG is fine for snapshots, but RAW is where the magic happens.
- White Balance: Auto white balance does a decent job, but why settle for “okay” when you can have “incredible”? Experiment with different settings to see what works best in various lighting conditions.
- Custom Buttons: Your camera likely has a few buttons that can be reassigned to your most-used functions. Save yourself some time fumbling through menus by assigning these buttons to settings like ISO, autofocus, or white balance.
Let’s talk custom modes. Most mirrorless cameras allow you to save a few configurations for quick access. Do you frequently switch between portrait and landscape photography? Save a custom mode for each! This way, you can change your setup with a single twist of a dial instead of resetting your settings each time.
Practice Makes Perfect
Here’s the thing: the best way to learn how to use a mirrorless camera is simply to use it. Real-world experience trumps everything. Make a point to shoot regularly, and don’t be afraid to experiment. Try out different lenses, settings, and styles of photography. Soon enough, what once felt foreign will become second nature.
Sharing Is Caring
Got some cool shots? Don’t let them gather digital dust on your hard drive. Share them! Whether it’s on social media, photography forums, or with friends and family, getting feedback is invaluable. Plus, you might just inspire someone else to start their own photography journey.
Frequently Asked Questions
What is the importance of customizing mirrorless camera settings?
Customizing mirrorless camera settings allows users to personalize their shooting experience, ensuring the camera behaves in a way that suits their specific needs and style. This personalized setup can significantly improve the shooting experience and outcome of photos.
Why should I shoot in RAW format?
Shooting in RAW format gives you more control in post-production. It captures all image data recorded by the sensor, allowing you to make more detailed adjustments like exposure and white balance during editing.
How can different white balance settings affect my photos?
Experimenting with different white balance settings can dramatically affect the mood and feel of your photos. It can help you accurately represent the lighting conditions or creatively alter the atmosphere of your images.
What is the benefit of assigning custom buttons on my camera?
Assigning custom buttons to frequently used functions speeds up your workflow. It allows you to quickly access important settings without diving into the menu system, making your shooting process more efficient.
Why is it recommended to save preferred settings as custom modes?
Saving your preferred settings as custom modes allows you to easily switch between different shooting scenarios without manually adjusting each setting. This is particularly useful for quickly adapting to changing conditions or subjects.
How can practicing and experimenting with my camera improve my skills?
Practicing and experimenting with your camera helps you understand its capabilities and limitations, encouraging you to try new techniques. Regular use and exploration can significantly improve your photographic skills and creativity.
What are the benefits of sharing my photos?
Sharing your photos can provide valuable feedback, helping you to see areas of improvement. It also allows you to inspire and be inspired by others, fostering a sense of community and support among photographers.